.
As I keep saying, this is a real class. We are partway thru the 2nd part of the 3 sections. Section 1 is terminology & rigging; Section 2 is practical; Section 3 is Navigation Rules which includes Right-Of-Way. In fact, we've covered a small amount of Sec 3 already.
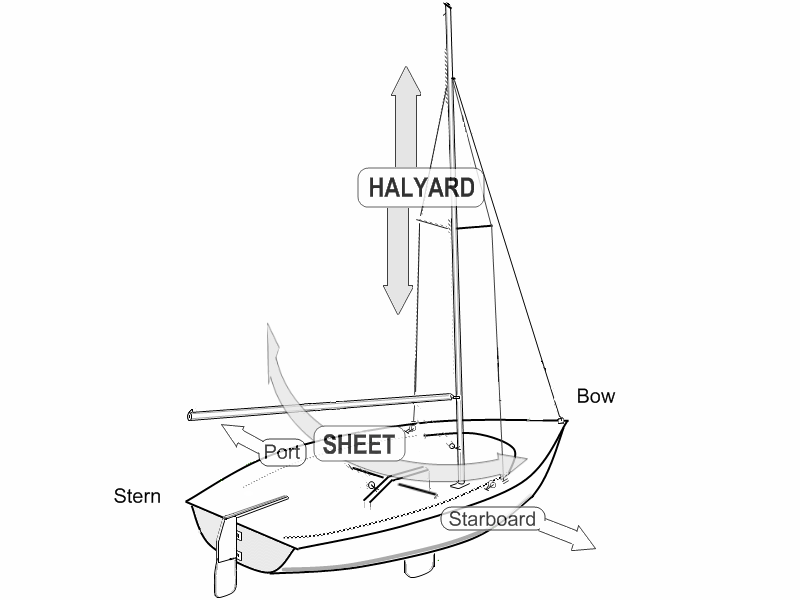
We've spent 5 weeks covering Section 1; names of parts of the boat, lines & knots, and rigging. There should be little or no confusion between standing rigging and running rigging.

"Standing Rigging" makes the rig stand up.
"Running Rigging" is what makes the engine... the sails... run.
This semester's class is having a lot of difficulty mastering the terminology, names of boat parts, names of basic actions. If we don't have this clear, it will be impossible to progress with the course.
Assignment Question
List the basic standing rigging of a SLOOP (four or more terms).
First, what is a SLOOP? It's a sailboat with a single mast, a mainsail, and a smaller jib. The Laser is not a sloop, because it does not have a jib. The Oday Javelin is a sloop, and all the boats we sailed this past Monday are sloops.
Basic standing rigging: Forestay, port shroud, starboard shroud, spreaders, chainplates (the part that attaches the shroud to the hull), and BACKSTAY (the big keelboats all had this). The big keelboats also all had multiple shrouds per side, some (uppers) went over the spreaders and others went to the root or foot of the spreaders.
 Assignment Question
List the basic running rigging of a sloop (six or more): we can organize these by sail or by function.
By function, each sail will have a HALYARD which pulls the sail up (and a cleat that holds it there); and each sail will have at least one SHEET which controls it from side to side.
Going by sail:
The jib has a halyard and port & starboard sheets, plus the big keelboats all have a jib furling line.
The mainsail has a halyard and a sheet, and a vang, an outhaul; and the big keelboats all had "travellers" with control lines port & starboard.
That is 10 lines in basic running rigging, for those that are paying attention.
.

We also need to know about CLEATS and how to tie the Cleat Hitch (upper right, blue rope).
Do we need to review
basic parts of the HULL, and all the functions of each part, too?
Probably.
But in the interest of making progress, let's just give a link to the sailing lessons (
Table Of Contents) for now and get into what we should already know about the practical side of making boats sail.
This diagram shows the Points of Sail. There is no short cut, in order to succeed you must simply memorize this.
Head To Wind, also called "In Irons," is not really a point of sail but rather a point of not sailing. The boat will not go forward.
It's easy to compare this diagram to an old-fashioned clock. "In Irons" is at 12 o'clock. Beam Reaching on Port Tack is at 3 o'clock.
Assignment Question
What is the difference between the boat at 3 o'clock and the one at 9 o'clock?
This diagram is not the Points of Sail, but written around the inside of the circle is a powerful hint on how to maneuver from one point of sail to another, and an important piece of terminology that you've heard by now. "Heading Up" is the act of turning the boat toward the wind, "Bearing Away" is the act of turning the boat away or into a wider angle relative to the wind. Each of these always involves 4 things: keeping a lookout before the maneuver, so as to avoid collisions and obstacles; communication with the crew, controlling the tiller or wheel of the boat to turn and then to straighten out on the new course, and adjusting the sails.
Our assignment asks: "What is the difference between the boats at 10 o'clock and 11 o'clock?" First let's identify the Points Of Sail. We have one boat Close Reaching, and the other is Close Hauled.
To go from Close Reaching to Close Hauled is going to involve turning the boat toward the wind... obviously we must first make sure we aren't going to cause a collision doing so, and then inform the crew of our intention (a preparatory command). We then 'head up' while the crew pulls in the sheet of the jib... on a big boat, the crew also will pull in the main, both using winches... and when the sails are pulled in about as far as they can be, we straighten out with the sails still driving the boat forward.

Steering steadily is obviously an important skill!
Assignment Question
Now, what about going from 11 o'clock (more like about 10:30) to about 1:30?
This would be considered "TACKING" and we have a
whole lesson it. So yeah, it's kinda important.
First, just as we discussed above, there are several necessary steps before you even get to the part in the diagram. Are we going to have a collision? Let's not just go blindly! Is the crew ready?
Specifically, to be ready for a tack, the crew has to prepare to cast off the lee (or working) jib sheet, and pull in the windward (or lazy) sheet. They must be prepared to shift sides of the boat.
.

Now let's make certain of our terminology. There is a TACK which is part of the sail
The TACK of a sail is the lower, forward, corner.
The TACK of the mainsail is often fastened very close to the GOOSENECK.
Where is the TACK of the jib fastened?
What are the names of the other corners of the sail?
.
Now let's go back to our Points of Sail
Assignment Question
What is the maneuver taking a boat from about 8 o'clock on this diagram to about 5 o'clock?
We already discussed 'tacking' so that's probably not it! 'Tacking' swings the bow of the boat towards & thru the wind so that the sails change sides.

When we swing the stern of the boat thru the wind, and the sails change sides, that is called "GYBING," in other words to make a GYBE. When the sails switch sides, the wind will push them across and this can be violent.
We will do the same things as TACKING... keep lookout at all times but especially before a maneuver; communicate with the crew, steer the boat, adjust the sails. When GYBING the adjust ment of the sails has an added importance and must be done with caution, also steering is likely to be affected by the kick of the sails when they swing across. All this is why gybing is usually not practiced in the early days of the basic sailing course.
.
We will practice TACKING before we tackle GYBING!!
.

Last but not least, because we will be sailing big boats, we need to understand about boats & docks.
One of the knots you must learn is the CLOVE HITCH
Our lesson on
ROPES & KNOTS (link)
The main things we must remember are the safety precautions with heavy boats, how we act while on docks, and that the skipper must be able to coordinate the movement of the boat with the dock lines.
When taking a boat's dock line, just put a wrap around a piling or cleat. Do not pull unless given the order. Likewise, when departing the dock, untie the cleat hitch or clove hitch but leave a wrap on, until the order is clearly given to cast off.
Always make sure that lines DO NOT trail in the water. This goes especially for dock lines, because the engine is running ... what could go wrong? A line caught in a propellor is a disaster. But we must also make sure that halyards & sheets & other lines never fall into the water.
Now let's continue with the class, demonstrate all the skills in practice, and get started on learning our next things!
...
posted by Assistant Sail Coach Douglas King
 .
.

 Engines introduce a new level of complexity, although they make it easy to go when the wind is light or the channel is too narrow to tack back & forth.