Friday, March 6, 2020

Class Work

.

As I keep saying, this is a real class. We are partway thru the 2nd part of the 3 sections. Section 1 is terminology & rigging; Section 2 is practical; Section 3 is Navigation Rules which includes Right-Of-Way. In fact, we've covered a small amount of Sec 3 already.

We've spent 5 weeks covering Section 1; names of parts of the boat, lines & knots, and rigging. There should be little or no confusion between standing rigging and running rigging.

"Standing Rigging"  makes the rig stand up.

"Running Rigging" is what makes the engine... the sails... run.

This semester's class is having a lot of difficulty mastering the terminology, names of boat parts, names of basic actions. If we don't have this clear, it will be impossible to progress with the course.

Assignment Question
 List the basic standing rigging of a SLOOP (four or more terms).
First, what is a SLOOP? It's a sailboat with a single mast, a mainsail, and a smaller jib. The Laser is not a sloop, because it does not have a jib. The Oday Javelin is a sloop, and all the boats we sailed this past Monday are sloops.


Basic standing rigging: Forestay, port shroud, starboard shroud, spreaders, chainplates (the part that attaches the shroud to the hull), and BACKSTAY (the big keelboats all had this). The big keelboats also all had multiple shrouds per side, some (uppers) went over the spreaders and others went to the root or foot of the spreaders.


Assignment Question
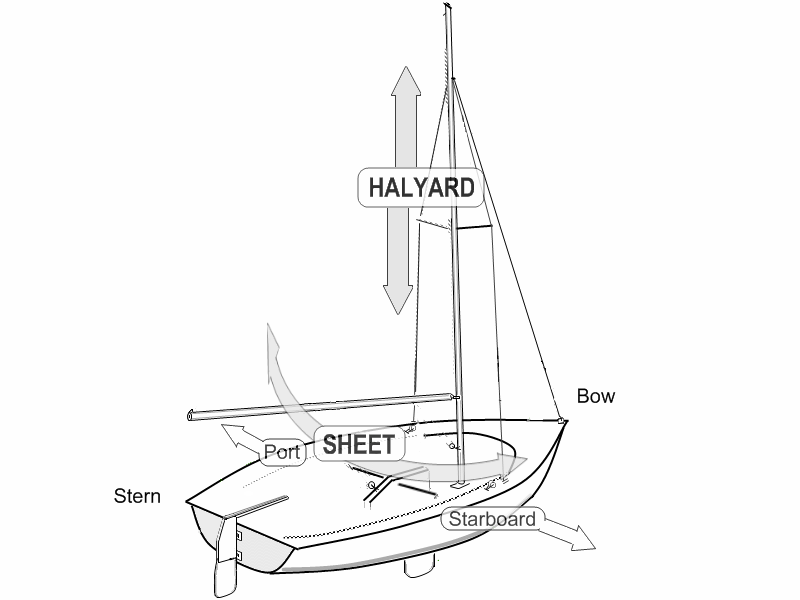
 List the basic running rigging of a sloop (six or more): we can organize these by sail or by function.


By function, each sail will have a HALYARD which pulls the sail up (and a cleat that holds it there); and each sail will have at least one SHEET which controls it from side to side.

 Going by sail:
The jib has a halyard and port & starboard sheets, plus the big keelboats all have a jib furling line.


The mainsail has a halyard and a sheet, and a vang, an outhaul; and the big keelboats all had "travellers" with control lines port & starboard.


That is 10 lines in basic running rigging, for those that are paying attention.

.


We also need to know about CLEATS and how to tie the Cleat Hitch (upper right, blue rope).


Do we need to review basic parts of the HULL, and all the functions of each part, too?


Probably.


But in the interest of making progress, let's just give a link to the sailing lessons (Table Of Contents) for now and get into what we should already know about the practical side of making boats sail.


 This diagram shows the Points of Sail. There is no short cut, in order to succeed you must simply memorize this.

Head To Wind, also called "In Irons," is not really a point of sail but rather a point of not sailing. The boat will not go forward.

It's easy to compare this diagram to an old-fashioned clock. "In Irons" is at 12 o'clock. Beam Reaching on Port Tack is at 3 o'clock.

Assignment Question
 What is the difference between the boat at 3 o'clock and the one at 9 o'clock?

This diagram is not the Points of Sail, but written around the inside of the circle is a powerful hint on how to maneuver from one point of sail to another, and an important piece of terminology that you've heard by now. "Heading Up" is the act of turning the boat toward the wind, "Bearing Away" is the act of turning the boat away or into a wider angle relative to the wind. Each of these always involves 4 things: keeping a lookout before the maneuver, so as to avoid collisions and obstacles; communication with the crew, controlling the tiller or wheel of the boat to turn and then to straighten out on the new course, and adjusting the sails.

Our assignment asks: "What is the difference between the boats at 10 o'clock and 11 o'clock?" First let's identify the Points Of Sail. We have one boat Close Reaching, and the other is Close Hauled.

To go from Close Reaching to Close Hauled is going to involve turning the boat toward the wind... obviously we must first make sure we aren't going to cause a collision doing so, and then inform the crew of our intention (a preparatory command). We then 'head up' while the crew pulls in the sheet of the jib... on a big boat, the crew also will pull in the main, both using winches... and when the sails are pulled in about as far as they can be, we straighten out with the sails still driving the boat forward.


Steering steadily is obviously an important skill!

Assignment Question
Now, what about going from 11 o'clock (more like about 10:30) to about 1:30?

This would be considered "TACKING" and we have a whole lesson it. So yeah, it's kinda important.

 First, just as we discussed above, there are several necessary steps before you even get to the part in the diagram. Are we going to have a collision? Let's not just go blindly! Is the crew ready?

Specifically, to be ready for a tack, the crew has to prepare to cast off the lee (or working) jib sheet, and pull in the windward (or lazy) sheet. They must be prepared to shift sides of the boat.


.


Now let's make certain of our terminology. There is a TACK which is part of the sail

The TACK of a sail is the lower, forward, corner.

The TACK of the mainsail is often fastened very close to the GOOSENECK.

Where is the TACK of the jib fastened?

What are the names of the other corners of the sail?


.

Now let's go back to our Points of Sail


Assignment Question
What is the maneuver taking a boat from about 8 o'clock on this diagram to about 5 o'clock?

We already discussed 'tacking' so that's probably not it! 'Tacking' swings the bow of the boat towards & thru the wind so that the sails change sides.

When we swing the stern of the boat thru the wind, and the sails change sides, that is called "GYBING," in other words to make a GYBE. When the sails switch sides, the wind will push them across and this can be violent.

We will do the same things as TACKING... keep lookout at all times but especially before a maneuver; communicate with the crew, steer the boat, adjust the sails. When GYBING the adjust ment of the sails has an added importance and must be done with caution, also steering is likely to be affected by the kick of the sails when they swing across. All this is why gybing is usually not practiced in the early days of the basic sailing course.


.

We will practice TACKING before we tackle GYBING!!

.


Last but not least, because we will be sailing big boats, we need to understand about boats & docks.

One of the knots you must learn is the CLOVE HITCH

Our lesson on ROPES & KNOTS (link)

The main things we must remember are the safety precautions with heavy boats, how we act while on docks, and that the skipper must be able to coordinate the movement of the boat with the dock lines.

When taking a boat's dock line, just put a wrap around a piling or cleat. Do not pull unless given the order. Likewise, when departing the dock, untie the cleat hitch or clove hitch but leave a wrap on, until the order is clearly given to cast off.

Always make sure that lines DO NOT trail in the water. This goes especially for dock lines, because the engine is running ... what could go wrong? A line caught in a propellor is a disaster. But we must also make sure that halyards & sheets & other lines never fall into the water.

Now let's continue with the class, demonstrate all the skills in practice, and get started on learning our next things!

... posted by Assistant Sail Coach Douglas King


Monday, March 2, 2020

A Sporty Day Sailing Big Boats


.


Our first day actually sailing real actual boats! A HUGE "Thank You" to the owners of  Dutch Wind, Vertical Wing, Georgie Girl, and Wicked Good.


This class has made progress, but not as much as it should for this time in the course. We've covered terminology, knots, and basic Points Of Sail, but the students are struggling to put this info to work.


.


Here is Dutch Wind shortly after a "TACK." You can see that crew still has work to do, that jib  should not be flapping (luffing).


Here is our Sailing Lessons On-Line, which covers the material for the 'Basic Sailing' course.

I strongly suggest more study, in fact we have laid down a rule that without turning in the written assignment, no student will be allowed to sail.

Now let's get to the photos... the weather today was grand for sailing, overcast but a steady southerly wind (what does that mean?) and light choppy waves. The boats were really moving today!

I can guarantee that the boats were moving well today because I took my family's motorboat out to observe the sailing class, to help if necessary, and to take photos. As we chased the keelboats today,  we had to really push the throttle up. My family's motorboat has a Caterpillar turbo V8 diesel with 450 hp so that shows the power of the wind!


Dutch Wind and Vertical Wing are racing rivals, and both were pushing 10 knots in todays' wind.

.


First, the students sailing on Georgie Girl. This boat has also won more than her share of races, and was moving right along. We can see the student skipper and crew preparing to TACK.


Now let's follow the tack, thru this maneuver. What is the first step?

Sailing lesson: TACKING


In this photo, the boat has begun turning into the wind. You can see that the mainsail is luffing (shaking or flapping). What has the crew already done?


.


What can go wrong when TACKING?


.


Now you can see the boat has turned far enough that there is no risk of getting stuck "in irons." The jib has come around to the new side.

You can also see, there is no wake. The boat has almost stopped completely. Could this be a problem? Why?


.


.


Now the sails are starting to fill on the new tack. Which tack is the boat on?

This terminology can be slightly comfusing at first, because "Tack" is part of the sail, and it is the name of this maneuver.

What is the crew doing now?


.


Okay, now the boat has TACKED. You can see the sails are full of wind, and driving the boat forward. The boat is beginning to heel as it gains speed.

Note for beginners... although the boat leans over when the wind is strong, the boat will actually go faster if the heeling is controlled. It is exciting but it is certainly possible to let the boat heel too far even if these keelboats will not capsize.


.


OK now what? The boat kept turning, past the point where the sails are full and the boat is driving forward strongly. Why?

My guess, as instructor of the class, is that the student at the helm, steering, was not familiar enough with how far to turn and did not do a very good job controlling the boat.


 So, we have much to learn. This was only our first day of real sailing, but we have done many days of preparation and practice for this (if not much study).


Conditions permitting, we will sail again next week and our standards of performance will be much higher.

We have a lot more to learn!

For example, this was not really a close call, but if it were, which boat would have Right-Of-Way? Yes, in order to pass this course, we will learn the Navigation Rules (which include Right-Of-Way).

I bet we all learned one good navigation rule today... none of the boats went aground, and part of that is due to the old saying "Red Right Returning" !! What does this mean?

Please work on the answer to all questions here today, they are relevant to THIS SECTION of the course. You should already know all the basic boat terminology without being reminded, and be well on your way to tying all the knots. This is the goal, to be able to sail, to be a SAILOR!!

... posted by Assistant Sail Coach Douglas King


.
.


Tuesday, February 25, 2020

Capsize... our Laser, Twin Rivers "Y" pool

.


Every class needs to begin with safety. This is what we learn, it's what we practice. How many ways are there to get hurt on... or around... boats?


Way more than a million. And this is not a joke or an exaggeration.


Here is our class, doing the work themselves to get the Laser rigged & launched in "Y" pool. They have just set up the mast and are rigging the boom... vang, downhaul, sheet, outhaul


So, are small tippy sailboats dangerous?

Yes, of course.


Are we crazy, doing this dangerous stuff?


No. Because we start at the beginning, with the very first set of skills, and we learn & practice how to do things safely, each step of the way, all the way up to being fully capable sailors with a range of boats, in a range of conditions.


The swimming pool is a great place to start. It's calm, it's easy to keep control of the situation. The students learn to handle the boat without other hazards or distractions.


Unfortunately, we don't have photos of carrying the boat in thru the door, which was one of the tricky parts of the operation.


From carrying the boat in, rigging it up, launching it... hopefully remembering to put in the transom plug... then putting in the daggerboard & rudder (what is the difference between a centerboard and a daggerboard?)... then getting on board a floating vessel, which is not necessarily like taking a walk in the park... are we ready to sail?


Uh Oh!!
As small boats often do, we capsized!

Step 1- make sure everybody on board is OK

Good here, but these two students have made one mistake. They have let go of the boat and it is possibly more than arms reach away. This is potentially hazardous, because out in open water the boat will drift downwind rapidly, possibly faster than you can swim. It is important to always hang on to the boat and not let it get away.


Step 2- Get control of the boat and of the situation. This means one person (usually the skipper) swims around the transom and grabs the daggerboard.


When one person is holding the daggerboard, several things happen. The boat cannot turn "turtle" with the mast pointing down... where it will get stuck in the muddy river bottom. With a person holding the daggerboard, the boat cannot blow away from the crew, leaving them stranded. Lastly, that person can control which way the boat swings around.


Step 3- when ready, right the boat with the crew using "the scoop" to get into the boat as it comes right-side up.

"The Scoop" is important because it enables full control of the boat at all times, and the weight of the person inside holds it stable.

DO NOT right the boat before all is ready. The sheets must be released, the centerboard or daggerboard must be fully down, the crew must be prepared to "Scoop."


DO NOT attempt to swim to shore.


This year, we have a fleet of Lasers which our advanced sailors... who have already learned to skipper the Javelins... will sail in the spring.


Because they will be singlehanding, with no crew, they had to demonstrate a capsize & recovery by themselves. No scoop, and nobody to help you into the boat!


.

It's just the sailor and the daggerboard!

This does not require great strength, but it does take a bit of determination and tenacity. Having good swimmer's kick skills is also a big help.


Also, brace against the hull and pull outward, to make sure the daggerboard is fully down. This gives you more leverage.


The sail has a lot of drag in the water, so the boat will only pull upright slowly. So just get a grip, and hang on.


Never bounce on the daggerboard. If you break it, you will be in a much worse situation!


.


The Laser does not have a halyard!
It's time to unrig, so the students pull the sail (the luff sleeve) off the mast.

We are careful with the sails, and never drag them on cement.

Very shortly, all students are dry, and back on the bus with their current Written Assignment in their hand


...  Assistant Sail Coach Douglas King


.

Monday, January 27, 2020

Javelins and Lasers... first day

.


First day of sailing class, we started learning about how to rig our boats, the names of parts of the boat... TERMINOLOGY... and a few knots.


These are older sails, but we have just put on a bear insignia... all our Javelins will fly this symbol!


We have two types of boats in this class, the Oday Javelin (Oday is the name of the company that built them) and the Laser.

The Javelin is 14 ft sloop, which means it has two sails. It is sailed by 2 to 4 people, and sits on a trailer (when not in the water) because they are too heavy to carry around. Question: what are the names of the two sails?


Lasers are more like zippy little sports cars, they have one sail and are sailed by a single person. In this class, they will be sailed by the advanced sailors although we will all use them for capsize practice.


Here's our advanced sailors, rigging up their Lasers. These have more parts to assemble, even though they have only one sail and in some ways, it is a simpler boat. Question: What is the difference between how the Laser and Javelin sails are attached to the mast?
.


For the first day, a lot of progress was made. We completely rigged two boats as teams; when we go sailing we will each have to rig our own boats. However we will carry & launch them in teams. Communication on board will be simpler with only one person!


.


The Javelins are a lot of fun, too. The beginner sailors got their boats completely rigged, too.

Most of the class was spent on learning the RUNNING RIGGING (lines) and STANDING RIGGING. Question: what are the two types of lines that control the sails? (hint: starts with "H" and "S")


If you want to study further, we have lessons on this web site. Here is the Table of Contents (link) for the on-line lessons.


Here is the beginning lesson on rigging (link).... you should know everything in this lesson, after today's class! But it's ok to review!

LCDR Fry is helping the cadets learn how to rig their boats. Question: what is the next step shown in the photo?


Even at this stage, the sailing class is fun... we had to do the work to put everything away properly, but that makes it quicker and easier to get going next time.


Next time, we will cover a few more parts of geting the boats ready to sail... for example, putting on the RUDDER

We did not cover much about parts of the HULL this time, here is our on-line lesson (link). Question: what is the name of the thing that the sailors holds to steer the boat?

Hint: it's NOT the rudder, but it's connected to the rudder


None of it as simple as it seems, but that's part of the fun.... it's a challenge, and while the beginners have not yet realized the thrill of getting under way in a boat that they rigged up themselves, they are making progress.

.... Assistant Coach Douglas King


.


Saturday, January 18, 2020

Spring 2020 sailing class... let's begin!

.

Here is the schedule for the spring semester Sailing Class, 2020.

Jan 27, New Bern High School
Feb 3,   New Bern High School
Feb 10, New Bern High School
Feb 25, Tuesday: Twin Rivers YMCA: Capsize Drill !!!
Mar 2,  Sailing Keelboats, Fairfield Harbour; weather permitting
Mar 9,  Sailing Keelboats,
Mar 16, Sailing Keelboats,
Mar 23, Sailing ??? possibly shift to small boats, location TBD
Mar 30, Sailing small boats, Javelins & Lasers; weather permitting
Apr 6,   Sailing small boats, Javelins & Lasers
Apr 20, Sailing, final exercises/drills
Apr 27, Sailing, final exercises/drills
May 4, Sailing, final exercises/drills

Monday, 1445 (or 2:45pm if you prefer) for all days. EXCEPT FEB 25 (Tuesday) at YMCA FOR CAPSIZE DRILL
As always, this class is broken down into three sections (safety and safe practices are an integral part of each lesson):
 .
Introduction with terminology and basic knowledge of knots and parts of the boat.
.
Sailing Practice with Points Of Sail and basic maneuvers (tacking, stopping).
.
Sailing Demonstration, all skills and Right-Of-Way... sailing as a fleet!

Here is our Sailing Lessons On-Line (link)

To pass this course, students will learn & demonstrate all terminology, knots, and practical skills as crew and skipper. Each section builds on the prior section, and students who have passed Basic Sailing will go on to learn & practice advanced skills.

.

Tuesday, November 19, 2019

Sailing keel boats... thank you FHYC!

.

For our last two sailing exercises, as the weather gets more risky, we have a small fleet of very nice keel boats thanks to some members of Fairfield Harbour Yacht Club (more below).

Sailing large, heavy boats is a different skill, but all the basics we've learned still apply. We still need to know the Points of Sail, the running rigging which controls the sails, and how to tack or gybe. We also need to remember everything we've learned about on-water safety!

 Here is Russ & Barb Robinson's Rampant Lion, a 37-foot Tartan keel boat... it also has a centerboard! At the moment Barb is skippering while the students learn about WINCHES.

.

Weather conditions were not good, it was cold and drizzly. But there was wind, and that's what we really need! Each big keel boat was manned by 2 or 3 students and all of them had a chance to work as skipper and crew on these vessels.

 Among the differences between the NJROTC small boats (Lasers and Javelins) and these big boats... they are much heavier, the sails are much bigger; and the forces, strains, or loads, on the sails and rigging are require far more strength than just the muscles of sailors. We use winches to magnify or amplify strength so we can handle these big sails, and like any other powerful equipment, winches take training to handle capably and safely.


Here is Peter B's "Wicked Good" a Catalina 28 with a diesel engine for auxiliary propulsion. 

Do we learn about engines in this class? Not really -BUT- to be capable sailors we need to know a few things about how to properly handle boats using engines instead of sails.

For example, we know to not let lines or ropes just trail in the water. It makes a mess and can cause problems. A dock line or a stray sheet or halyard on these boats can wrap around the propellor, causing major damage and serious injury.


These bigger boats require deeper water, so we not only need to learn how to steer & control them using engine power, but also how to navigate them keeping to deeper water. The cadets were introduced to the old saying "Red Right Returning" to keep in mind where the deeper water, the channel, is!


.


Here is Ed & Evelyn Thompson's cruising machine "Dutch Wind."


.

Tuesday, November 5, 2019

More Sailing Practice

.

How do you get to Carnegie Hall? Practice, practice, practice!

Well in our case, that's how you pass the Basic Sailing qualification. Aside from that, it's fun to sail and it's enjoyable to learn new things and to gain skill and confidence.

At this point, our students have learned quite a lot, they demonstrate their ability to accomplish most of the goals of the Basic Sailing class, but there are a lot (many many!) details to remember and so they need a lot of reminders and more practice.

As always, we begin by rigging up our boats. Student working with Coach Clay is checking the ropes that pulls the sail UP (what do we call this, again?) 


Last week we learned to STOP the boat (link) and keep it under control, and practiced everything else we've learned up to this point. We attempted the first Baby Duck drill but it most resembled a disorganized gaggle of stray birds. This week, we did another Baby Duck drill which went better and we also completed another beginners' drill.

One of the keys to this class... as with many many other endeavors... is remember what we've learned before. You can't simply forget Ropes & Knots, or Terminology, just because we're getting ready to practice our final sailing drills!


 You can also see here that the weather is a bit cooler. Still we have had very good luck to have many sailing days in a row, and get in a lot of practice. About half the class has been very successful, and is rigging up efficiently and with confidence.


 So now that the students are actually out there, going sailing FOR REAL, what do we need to do to pass this class?


1- Rigging and terminology- this includes all the funny "boat words," names for parts of the boat, knowing how to tie the 4 assigned knots AND where/when to tie them, standing rigging, running rigging... basically, everything we have to do when we get off the bus and get ready to GO sailing.

2- Basic sailing skills (yes there are advanced sailing skills we can work on later)- sailing the boat on any Point of Sail, maneuvering the boat from any Point Of Sail to any other including Tacking and Gybing, sailing to any given destination and then bringing the boat to a Stop at a given point (such as the dock!). This includes know and doing the crew jobs, the skipper jobs, trimming or easing the sails properly, and holding the boat in balance while sailing.

3- Operating safely in & around boats- This starts at the very beginning, and goes all thru the class. Every sailing student must constantly be aware of, and avoid, the many hazards; the final part of the class is when we learn the Navigation Rules (also called "Rules Of The Road" despite being about boats)(link) and how to operate our boats safely in the context of other boats and the marine environment.


At this point, we've got about 90% of requirement 1, about 75% of requirement 2, and about 25% of the final requirement 3.


What we need to improve- basic habits of sailing the boat, we need to remember to hold the boat in balance by sitting where we should, handle the sheets and the tiller the way we should, and this will in turn make it much easier to make good tacks (our tacks are noticably better!) and good gybes.


If you look closely, you can see the coach boat at left with the "L" flag for Baby Duck drill. You can also see how the boats are strung out over a wide area, although the closest one is practicing slowing to a stop.


There are several other drills (link) we should be able to perform as well as Baby Ducks.


This falls under class requirement #2 above, where the student shows the ability to sail the boat to any given goal and do the maneuvers while keeping the boat under control.


At this point, most of this is falling into place but we need to work on "Stop" and also Gybe, and start putting the Right-Of-Way rules into our sailing practice.


You can see why we need to know the Right-Of-Way rules. There were still a few mild collisions today, and often when the boats got close together there was a tendency for them to scatter randomly. This is not the way traffic is supposed to keep flowing!


The students need to be able to do all this as both skipper and as crew, so we need to change places within the boat.


Here is Coach Earl Hampton in his Coach Kayak. This is a great way to keep close to the students underway, both to be able to keep a close eye and to offer helpful advice.


.


Here's two of our better sailors, they rigged up their correctly and efficiently (although thy did not hoist their mainsail fully... look at the top of their mast), so they get the honor of sailing out first! Can you tell what Point Of Sail they are on, to get out from between the dock and the rock wall? 

Some helpful advice: their sails are trimmed well, the boat is in balance, the skipper is holding the hiking stick correctly. Once they are underway safely, the crew should stow the bow line securely so it cannot trail in the water under the boat.


.


Another student sailing with Coach Dave Pettipas as crew. Here they are on a Close Reach (compare the position of the boom relative to the transom, with the photo above), soon after a successful TACK. Unfortunately this boat, which was recently donated, does not have a hiking stick (it will soon!).


You can see in these to sailing photos, the Javelins bustle right along in a fairly mild wind! This is a big part of the fun!


And finally, we have to pull the boats out of the water and trailer them back to school.


.