.
We wish all our cadets & coaches, all our families, and all of our brothers & sisters in the service who are far from home, boat-loads of joy and a MERRY CHRISTMAS !!
Friday, December 24, 2010
Monday, December 6, 2010
We don't let winter stop us!
This past weekend, the New Bern NJROTC sailors got in several kinds of action. Saturday, two cadets came out to the NYRA Winter Series (link) races. On Sunday, the town of Trent Woods had it's popular Christmas Parade which the NBHS-NJROTC brigade marched in. The sailors had a float (kind of appropriate, when ya think about it) made up of a decorated sailboat, and 4 members of the sailing squad throwing candy to the crowd.
Let's start with the sailing: they call it the "Winter Series" but usually it's a bit warmer than this. Everybody was bundled up and many were hoping the races would be called off. I don't know what they were complaining about, here on my boat (a Santana 23, the smallest of the fleet) we were comfy enough.
This photo shows the skipper (Bill D) and middle crew relaxing before the 1st race. Actually it wasn't very relaxing, it was cold... it was a lot better once we got to work & warmed up!
.
This photo (left) shows the chase boat manned by Blackbeard Sailing Club veteran Ken Gurganus and and cadet A.F. from New Bern NJROTC. It was actually colder on the "chase boat" than it was under sail, but our volunteers did get to relax on the luxurious Race Committee vessel.
.
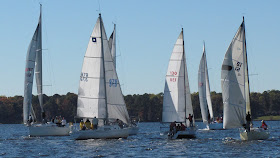
Here is Coach King's BLUE YONDER on it's way to a 2nd-place finish (out of 7 racers) with cadet J.V. as crew (seated on windward rail). It is a lot of work racing a small complex racer/cruiser (which has to be launched just like our FJs) and the crew warmed up a lot, especially when handling the spinnaker!
(thanks to John Y. Jackson for this photo)
POP QUIZ: What point of sail, and which tack, is this boat on?
.
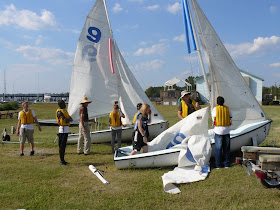
Here is work just beginning on our Javelin #2, to transform it into a Christmas Parade float. Head Coach Rezab has rigged the boom as a mast, and flown the signal N-B-H-S on the forestay, and signal N-J-R-O-T-C on the backstay.
POP QUIZ: What does this boat's standing rigging normally consist of? What has been added, what is missing?
.
.
Unfortunately not all our sailor cadets got to ride in the boat-float. But they were great about helping to decorate it for Christmas... and the rudder didn't drag either!
Here is part of the brigade getting formed up to march in the parade.
.
.
You can see the right mix of pride and self-discipline here... that cold cold wind is blowing. I predict that many of the young people will go far in life!
The plan is to continue sailing when the weather permits; we have arranged the loan of two San Juan 21 ballasted sloops which will better for potentially cold operations. We will also continue to have class for those who want to learn. See you next week!
... posted by Assistant Coach Doug King
Wednesday, November 17, 2010
Cape Lookout Power & Sail Squadron shows serious support
The U.S. Power Squadron has a long history of being involved in boating projects, including education... almost a century in fact. The New Bern area is home to the Cape Lookout branch (link) and this is a great organization of sailors and power boaters together.
(photo at right) Two weeks ago the Cape Lookout Power & Sail Squadron held a chili cook-out, charging only 5$ for an all-you-can-eat bowl of chilli; several different people cooked up their varieties ranging from "not all that hot" to "scorch your socks." This was held at Fairfield Harbour and was considered a big success by all!
This week, the CLSPS presented a check to Cadet Chris Wheeler, commander of the New Bern NJROTC sailing squad, of the funds raised at the chili cook-out. This will be a welcome addition to the "New Sail Fund," in fact it is a bit more than a new set of sails so we can afford to travel to some events this spring!
(photo at left, from left) Captain Richard Tobacco, Assistant Sailing Coach Doug King, Cadet Chris Wheeler, LCDR Craig Tyson
We offer sincere thanks to everybody who made this event possible, especially those who showed up hungry!
... posted by Assistant Coach Douglas King
Sunday, November 14, 2010
Cadets Racing in N.Y.R.A. series
Yesterday (Saturday Nov 13) was the 2nd event in the Neuse Yacht Racing Association "Winter Series." Three of our cadets were present, one manned the chase/rescue boat and 2 other crewed on one of the racing boats.
(photo at right Sail #130) Santana 23 BLUE YONDER, the smallest boat in the Spinnaker Fleet, was 75% crewed by New Bern NJROTC cadets, who got a quick lesson in how to handle winches and then proceeded to apply that lesson in tacking & trimming a genoa (headsail like a big jib, only much bigger). It was also their first experience flying a spinnaker.
There were several requests from vessels for crew, Coach King took advantage of his position to get a monopoly.
This photo (left) shows BLUE YONDER with cadet crew sailing into the action with the Race Committee boat PICCOLO (dark hull powerboat) in the background.
Races like this provide a test of sailing ability, concentration on precise boat-handling and sail trim, and a serious lesson on the Right-Of-Way rules.
There are several more N.Y.R.A. events scheduled thru the winter & spring, so this opportunity is open to cadets in our sailing program. Anybody interested should contact Coach Hittner.
... ...posted by Douglas King
Monday, November 1, 2010
A hearty THANK YOU to the Cape Lookout US Power Squadron
This Saturday (30Nov2010) the Cape Lookout Sail & Power Squadron (link) cooked up a big pot of very good chili.
Red Sail Park in Fairfield Harbour was the scene of this chili fest, and the proceeds are to benefit US. Our program is doing great, but there are certainly a lot of things we need and this will be a big help.
posted by Assistant Coach Doug King
Monday, October 4, 2010
Advanced Drill: sailing to windward... "The Pipeline"
.
We have several drills which work on the skills of sailing to windward.... ... one is "The Cone" (link) ... and here is another to work on these specific skills.
First, what are the skills of sailing to windward? One is recognizing when the boat is CLOSE-HAULED. This is when the sails are pulled in tight, the boats is sailing at a an angle close the wind direction. Sounds easy!!
You can see at a glance (and it also follows common sense) that a sailboat cannot sail upwind by simply pointing straight into the wind. Some people might say that it is not common sense that a sailboat can go upwind at all... ... ... ...
.
One of the keys to sailing CLOSE-HAULED is that the sails are pulled ("hauled") in tight ("close") and the skipper must steer carefully to keep the wind angle just right: sails driving but not at too wide an angle.
Boat A is sailing at too close an angle to the wind. Her sails are pulled in as tight as possible, but they are not producing much drive & the boat is moving slowly, almost certainly making leeway (the centerboard prevents leeway, but it is also a foil and needs velocity of flow just like the sails need wind).
Boat B is sailing a close-hauled course, "pointing" at a close angle but not too close to the wind. Her sails are driving & her speed is sufficient.
Boat C is also sailing close-hauled, but at a slightly wider angle... her sails may actually be eased just a small bit. She will be moving forward at greater speed than Boat B, but due to the wider angle she will have to sail a greater distance to arrive at an upwind goal.
.
Now we get to the actual Pipeline Drill!
The buoys are set as gates in a line to windward. This keeps the students focussed on making progress upwind towards a specific goal. The buoys also serve as fixed reference points to help keep the students oriented to what their sailing/wind angle is, to help them get familiar with judging the point at which to tack towards a goal, and of course they get to practice tacking effectively.
In this diagram (to the right -> -> ) we see two boats in "The Pipeline." One has just completed it, the other is just beginning.
The beginning boat enters the downwind (leeward) or lower gate. They are on PORT TACK (remember, a sailboat is always "on a tack" referring to which side the wind is coming over; this is different from the action of "tacking"). She is close hauled, and the skipper has just realized that he will have to TACK at a point where he can aim the boat thru the next gate.
You can see that TACKING will be a key skill to complete this drill; both the timing of when/where to tack so the boat's course will go thru the next gate; and of course being able to tack effectively.
.
Let's look at TACKING. This is when the sailboat turns toward the wind & continues turning until the wind is on it's other side.
note- not every turn is a TACK. Be sure to know when you're turning so the wind is going to change sides; and make sure you know whether you are GYBING or tacking!
The Skipper's Job- to plan the tack so that the boat goes where it is supposed to... ... to steer the boat & keep it under control at every moment thru the maneuver... ... to handle the main sheet... ... shift his/her position so that 1- visibility of the boat's path & it's sails are clear and 2- the boat stays (relatively) level.
Somewhere in there, the skipper must communicate with the crew. This is where the traditional commands "Ready about" and "Helm a-lee" come in handy. These are the preparatory & executive commands... "ready about" means get ready to tack... "helm a-lee" means the tiller is moving to the leeward side of the boat, thus the boat is turning, so begin doing whatever is needed to tack.
Skippers should also note that it is their job to make sure the boat really does tack, that it does not stall in irons or end up pointed straight into the no-go or dead zone, at too close an angle to the wind.
The Crews Job: the tasks assigned to the crew never change, however the priorities can be different at times. The crew is the lookout, the crew is the line handler for all lines except the main sheet, the crew is the moveable ballast which does the most to keep the boat from heeling excessively.
When tacking, the crew should make sure there are no close obstacles in the boat's path, or to make sure the skipper knows about anything he needs to steer around. More communication! The crew must shift the jib sheets as the boat tacks, so that the jib helps drive the boat as much as possible into the tack, and fills on the new tack to regain drive as soon as possible after the tack. The crew will probably (not always) need to shift his position also.
Key Points: 1- the boat must be accurately steered from a close-hauled on one tack to close-hauled on the other tack... 2- the sails must be handled so that the boat keeps moving... 3- the skipper & crew must shift their positions in the boat to keep it level as possible.
Back to the PIPELINE DRILL
Can the students tack right between the gate buoys?
If you're good, sure... but probably not.
Make the tacks properly, get moving on a close-hauled course, plan your next tack, continue...
Before long, it will seem easy. Then we will begin to take it to the next level with 'The Cone' drill, refine our ability to trim the sails for best drive, possibly get some lessons on roll-tacking, and perhaps begin learning how the laws of physics allow a boat to sail against the very force that is propelling it in the first place.
One of the great things about sailing is that there is always plenty more to learn.
...posted by Assistant Coach Doug King
We have several drills which work on the skills of sailing to windward.... ... one is "The Cone" (link) ... and here is another to work on these specific skills.
First, what are the skills of sailing to windward? One is recognizing when the boat is CLOSE-HAULED. This is when the sails are pulled in tight, the boats is sailing at a an angle close the wind direction. Sounds easy!!
Here's a refresher on the
POINTS OF SAIL > > > >
You can see at a glance (and it also follows common sense) that a sailboat cannot sail upwind by simply pointing straight into the wind. Some people might say that it is not common sense that a sailboat can go upwind at all... ... ... ...
.
One of the keys to sailing CLOSE-HAULED is that the sails are pulled ("hauled") in tight ("close") and the skipper must steer carefully to keep the wind angle just right: sails driving but not at too wide an angle.
Boat A is sailing at too close an angle to the wind. Her sails are pulled in as tight as possible, but they are not producing much drive & the boat is moving slowly, almost certainly making leeway (the centerboard prevents leeway, but it is also a foil and needs velocity of flow just like the sails need wind).
Boat B is sailing a close-hauled course, "pointing" at a close angle but not too close to the wind. Her sails are driving & her speed is sufficient.
Boat C is also sailing close-hauled, but at a slightly wider angle... her sails may actually be eased just a small bit. She will be moving forward at greater speed than Boat B, but due to the wider angle she will have to sail a greater distance to arrive at an upwind goal.
.
Now we get to the actual Pipeline Drill!
The buoys are set as gates in a line to windward. This keeps the students focussed on making progress upwind towards a specific goal. The buoys also serve as fixed reference points to help keep the students oriented to what their sailing/wind angle is, to help them get familiar with judging the point at which to tack towards a goal, and of course they get to practice tacking effectively.
In this diagram (to the right -> -> ) we see two boats in "The Pipeline." One has just completed it, the other is just beginning.
The beginning boat enters the downwind (leeward) or lower gate. They are on PORT TACK (remember, a sailboat is always "on a tack" referring to which side the wind is coming over; this is different from the action of "tacking"). She is close hauled, and the skipper has just realized that he will have to TACK at a point where he can aim the boat thru the next gate.
You can see that TACKING will be a key skill to complete this drill; both the timing of when/where to tack so the boat's course will go thru the next gate; and of course being able to tack effectively.
.
Let's look at TACKING. This is when the sailboat turns toward the wind & continues turning until the wind is on it's other side.
note- not every turn is a TACK. Be sure to know when you're turning so the wind is going to change sides; and make sure you know whether you are GYBING or tacking!
The Skipper's Job- to plan the tack so that the boat goes where it is supposed to... ... to steer the boat & keep it under control at every moment thru the maneuver... ... to handle the main sheet... ... shift his/her position so that 1- visibility of the boat's path & it's sails are clear and 2- the boat stays (relatively) level.
Somewhere in there, the skipper must communicate with the crew. This is where the traditional commands "Ready about" and "Helm a-lee" come in handy. These are the preparatory & executive commands... "ready about" means get ready to tack... "helm a-lee" means the tiller is moving to the leeward side of the boat, thus the boat is turning, so begin doing whatever is needed to tack.
Skippers should also note that it is their job to make sure the boat really does tack, that it does not stall in irons or end up pointed straight into the no-go or dead zone, at too close an angle to the wind.
The Crews Job: the tasks assigned to the crew never change, however the priorities can be different at times. The crew is the lookout, the crew is the line handler for all lines except the main sheet, the crew is the moveable ballast which does the most to keep the boat from heeling excessively.
When tacking, the crew should make sure there are no close obstacles in the boat's path, or to make sure the skipper knows about anything he needs to steer around. More communication! The crew must shift the jib sheets as the boat tacks, so that the jib helps drive the boat as much as possible into the tack, and fills on the new tack to regain drive as soon as possible after the tack. The crew will probably (not always) need to shift his position also.
Key Points: 1- the boat must be accurately steered from a close-hauled on one tack to close-hauled on the other tack... 2- the sails must be handled so that the boat keeps moving... 3- the skipper & crew must shift their positions in the boat to keep it level as possible.
Back to the PIPELINE DRILL
Can the students tack right between the gate buoys?
If you're good, sure... but probably not.
Make the tacks properly, get moving on a close-hauled course, plan your next tack, continue...
Before long, it will seem easy. Then we will begin to take it to the next level with 'The Cone' drill, refine our ability to trim the sails for best drive, possibly get some lessons on roll-tacking, and perhaps begin learning how the laws of physics allow a boat to sail against the very force that is propelling it in the first place.
One of the great things about sailing is that there is always plenty more to learn.
...posted by Assistant Coach Doug King
Monday, September 20, 2010
Sailing day... great weather, couldn't be better for practice!
The New Bern NJROTC fleet got some pretty good sailing action this afternoon. the weather was so perfect it was almost unbelievable: clear & sunny but not too hot, 6~8 knot north-east wind, no wave action or chop (except the wakes of the coach boats).
However, it seems likely that the cadet sailors were too busy to appreciate how fine it was!
(...photo at right... some of the coaches seeing our newly-donated chase boat for the first time... Thanks Brett!)
.
(...photo below left... the advanced students rig & launch their FJs)
Although the group sails together & sticks together, there were two almost-seperate activities going on. We have a small (but elite) group of returning sailors, experienced skippers who just need a quick refresher before sailing to glory. So FJ#1, FJ#2 and FJ#3 did variations on "The Clock" drill, then some practice tacks & gybes (working our way up to roll-tacking but not quite there yet), then practiced some docking approaches.
.
.
We also have a group of new sailors. They have proven their mettle in capsize drills in the pool, and practiced rigging & knot-tying & simulated maneuvers on dry land... today was their first chance to get out & prove what they can do on the river!
(...photo at right... traffic at the leeward point of "The Clock"
The coaches rigged & launched FJ#4, FJ#5, and FJ#6 this afternoon for the newcomers; in the future they will do this themselves just like the veterans. But for now, we wanted more time on the water & to focus on actual sailing skills. Some of them aslo tried out "The Clock" but it looks like we need to be baby ducks for a while yet.
OK we have done capsize drills... does everybody remember what THIS means?
Remember when I mentioned there were some not-too-pretty gybes? Here's what can happen. Then it was followed up by the crew playing "mountain climber" in the cockpit. Those floaties on the upper sidestays really work well.
Kidding aside, this is important. In stronger winds, the floaties can be driven under... the Neuse River is not deep enough for an FJ mast. That means it would stick into the bottom mud. From there, things go bad to worse.
Fortunately, everything worked out well in the end. The boat was righted by the skipper, the crew 'scooped' in just fine, all recovered, and they kept on sailing.
So the big lesson for the day... SAIL ON!
posted by Assistant Coach Doug King
Tuesday, September 14, 2010
Splash!! ...it's capsize at the Y time...
The fall 2010 sailing group finally had a chance to get wet, only not in the Neuse River.
The New Bern YMCA is generous to allow us to practice the capsize drill in their pool.
As the cadets learned during the summer, capsizing in the pool is EASY compared to the real thing! We want to be prepared, so it's good to get familiar with the boats & how to handle them... under mild conditions and with the situation fully under control.
We also have video of this capsize training session, but it is not edited yet... sorry!
Feet under straps... that way, you stay with the boat whether it fully capsizes or not...
Unfortunately the skipper has let go of the hiking stick at this point. The rudder is out of the water, so it doesn't really matter BUT this is all part of doing the job correctly!
We concentrate on learning one thing at a time... got the feet right, we'll get the hands right later!
.
.
Ready or not, over you go!
Isn't it cheating to keep the boat in 5 1/2 ft deep water, where you can stand up but the other cadets can't?
.
.
Nothing like a nice refreshing swim!
In this session, two experienced cadets swam next to the boat & capsized it for the newbies.
.
The skipper swims around the transom & grabs the centerboard. In many cases, it's possible to right the boat quickly by pulling it down (do your chin-up exercises!), but the training is to wait for the crew to rig a righting line.
Most of the novice skippers were concentrating on getting into the boat, and doing the drill... which is good... however with no mainsail rigged, the boom tended to swing wildly.
Some of the cadets remembered that the skipper is supposed to STEER and held the hiking stick. This cadet was the only beginner to also take the mainsheet in hand to control the boom!
.
Here's why the coaches keep reminding the cadets "keep your feet tucked under the hiking straps!"
You don't want to fall out of the boat. Out on the river, this boat would probably have popped back up & sailed off on it's own.
Very good training! Even the experienced cadets have not been in an FJ for almost 2 months, so they needed the reminder. And the newbies showed they can float, and also perform needed tasks under pressure, while in the water.
.
Posted by Assistant Coach Doug King
Monday, September 13, 2010
The First Lessons Are the Hardest.... (really?)
OK, we're off to a good start. Hopefully this page will make it a little easier to learn & remember all those funny words NAMES FOR BOAT PARTS.
Why do we need to know a bunch of weird words?
After all, you don't need to know what's inside an engine to drive a car!
Big difference- in driving, you are operating the vehicle by yourself, you don't have a crew which you need to communicate with.
On the other hand, you DO need to communicate with other drivers, only not in words. For example, we know what kind of chaos (and danger) happens when a driver does not know what a red light means.
.
.
In order to communicate with other sailors, you need to know the language.... and it is similar to learning a foreign language.
We could get by saying "that pole which holds the sails up" instead mast; and "the front big white flappy thing" instead of jib. Sometimes very good sailors will talk this way, joking around. But in an emergency, knowing the right word is necessary for quick, clear understanding. And good sailors do just that!
These diagrams show 16 of the basic operating parts of the Flying Junior sailboat. These parts will have the same names, and same functions, and pretty much the same form, in all sailboats... so this is a good place to start.
How many more terms do you need to know? For a start, see if you can think of a few very important parts which are not diagrammed here...
hint: two key parts of running rigging are not shown
.
One very important part not shown here are the DRAIN PLUGS!
Is it really necessary for us coaches to teach you about these, or why they're important?!?
Coming next... Capsize drill at the YMCA!
posted by Assistant Coach Doug King
Monday, August 30, 2010
Getting Ready For Sailing, Fall 2010 Semester
Well, isn't life interesting. Just as we are getting ready to launch the Fall 2010 sailing classes, we have a hurricane knocking on the door. You non-sailors may not follow this kind of thing closely, or may dismiss it as hype from the weather channel; but those of us who take care of boats (our own, or the NJROTC fleet) have to be prepared. The threat is very real, it doesn't take much severe weather to knock the boats around (link), and the high water brought in by a surge could carry the boats far away.
But let's talk about more cheerful things. We have a schedule, this coming Thursday (Sep 2) will not be a sailing day BUT it will be a training day. Qualified cadets will have a chance to show their skills, newcomers will have a chance to see what they're getting into. The weather may prevent bringing an FJ to the school. If possible, we will have a hands-on session with a real boat.
From now on, count on Monday to be sailing days (except for holidays). We will not sail on Monday Sep 6, but there is a make-up session scheduled for Thursday Sep 9.
The following Monday Sep 13, we will bring an FJ to the YMCA pool for capsize drill & swim tests. Bring a swim suit and a towel!
(photo of capsize drill on 12 Apr 2010)
Monday Sep 20 will be a sailing day. And so on, etc etc! Remember that attendance is counted, we have some sailors from spring who missed too many days to gain their skipper's qualification... Don't let it happen to you this fall!
For new sailors- as you can probably guess from the pictures, and from the stories told by the experienced cadet sailors, this program is a LOT of fun. It's also a lot of work, and the safety precautions are no joke. You will be expected to study, there are written tests, and following the instructions of the coaches is not optional. Sailing is not for everybody.
For you returning sailors, expecially the qualified skippers who are candidates for the aiguillette...
posted by Assistant Coach Doug King
Tuesday, August 17, 2010
New (well, new to us) Boats !!
This is a great week for New Bern NJROTC Sailing... with an expanding program, we need more boats. And now, thanks to hard work by the coaches and generous gifts from people who think it matters, we are getting a coach/chase boat, and a Javelin to sail in the fleet.
Here is the "new" Javelin on her trailer, on her way home... many miles to go, but we will dress her up in some new rigging and promise her some sailing action this fall!
Remember our regatta from this spring (May 2010)? Here's a pic of FJ#5, which was donated last winter, being closely followed by Brett M in his "stealth" inflatable. Brett likes the sailing program, has helped us at several sessions in a coaching & safety role, and announced that he would strongly consider donating the boat 'some day.'
Well apparently Some Day has arrived sooner than we thought! Brett is getting a new(er) boat for himself and we hope to welcome him back to future sailing events or training sessions!
posted by Assistant Coach Doug King
Monday, August 16, 2010
Sailing Drills...
Why have sailing drills?
When we sail a boat, we need to do at least 11 or more things simultaneously. So, a beginning sailor (especially the skipper) typically gets yelled at "Pull the fumbledygumble" or "Straighten your mapperfrapper" and a constant stream of similar nonsense.
When we have sailing drill, we practice ONE specific task; and we do it all together so the student not only gets feedback on their own skill but also sees examples of how to do it (or how not to, in some cases). For now, just for the drill, ignore the mapperfrapper & fumbledygumble. We'll work on those things later!
"Baby Ducks"
The basic of basics... usually this will be the first sailing exercise
No buoys, this drill is entirely dependent on the coach boat following a good course for the beginner students.
With the "Baby Duck" drills, the student only has to practice ONE skill at a time. Ignore sail trim, point of sail, balance, navigation, right-of-way, etc etc etc. Well, it helps if the crew trims the jib somewhat-properly. But all they have to do is steer & follow the others.
Skipper should focus on steering the boat steadily & accurately. The goal is to acquire a “feel” for the tiller. The boat will not go straight just because you are holding the tiller straight!
Notice that the students still have to TACK (turning the boat so that the wind crosses the bow, and comes on the other side). This is not difficult but they should at least know what's coming. They should also observe for themselves that the boat cannot sail straight into the wind!
While tacking, the student skipper(s) can practice shifting sides with the mainsheet & tiller extension. The crews practice keeping the boat from heeling by shifting their weight & trimming sails, and of course keeping lookout.
Here is where the "Baby Duck" drills really pay off. The instructor controls when the students GYBE their boats for the first few times.
The student skippers & crew practice moving & trimming sail together; work on anticipating the gybe. All should be smooth & coordinated. Watch for the jib to lose wind, this is when the crew begins to shift the jib sheet & can then help the skipper bring the main across.
Once the students can steer, and keep the boat under control (or at least fake it) thru the basci maneuvers, it is time to add to their skills. The "Baby Duck" can be used to reinforce learning the basic points of sail.
In this diagram (left) we see one boat hasn't quite got the hang of "CLOSE-HAULED" yet.
There are other, later drills which will emphasize sailing to windward, but this will get us started.
And of course, once we have sailed upwind for a while, we will need to turn & go downwind... this is also a basic skill that needs practice
Students who demonstrate they are fully in control of their boats through-out the various "Baby Duck" drills are good candidates to move up to advanced practice.
......................................................................................................................................................................
Docking... when stopping is more important than speed...
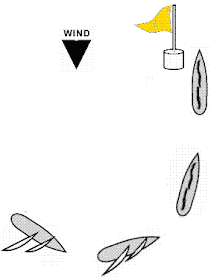
Once we get pretty good at "baby ducks" then the next step is learning to stop the boat. A sailboat will never really stop & stay in one place; it is always under the influence of wind & current (this is why the anchor is an important piece of safety equipment) BUT we must be able bring the boat in... just like pilots must learn to land an airplane... in order to go out.
If you can't STOP you are not in control!
Stopping Without Brakes (just sails) (link)
One way to stop & park is to simply turn the boat directly upwind. The sails will flap, the boat will coast to a stop. A problem: as the boat slows down, the rudder loses effectiveness... you can't steer!
Pointing the bow into the wind will bring the boat to a stop (right).
Another problem: you need an open & safe area to windward for the boat to 'coast' on it's momentum.
Another problem: you can never be exactly sure where the boat will stop... in light air, there is less drag on the sails, and it may 'coast' a surprisingly long way. In strong wind, the boat is going faster under full sail, but the drag on the sails & rig is much stronger and slows the boat's progress much more... it goes faster but doesn't 'coast' as far.
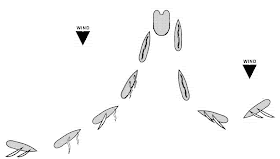
When beginner skippers are practicing DOCKING it is common to see them misjudge the momentum of the boat, either coming in too fast or stopping too soon and being unable to reach. This is why it takes practice!
With a coach boat anchored, students make their docking approaches in open water, coming up to a nice soft inflatable "dock."
This way we gain the skill to make perfect landings under a wide variety of conditions... this will enable us to SAIL in a wide variety of conditions!
.......................................................................................................................................................................
"The Clock"
This is actually several drills which be expanded from a basic exercise/drill to advanced racing games.
The buoys are set in a big circle; in the BASIC exercise, the students simply sail to & past each one. This takes them onto every point of sail, and obviously they will have to tack & gybe on their way round the "clock."
This is a good reinforcement for students who can steer the boat and are beginning to learn how to set the sails for each "point of sail."
If any student shows a tendency to sail of into the distance, the coach can give him the challenge of sailing close to each buoy on his way around the circle, and having the crew touch each one. No going back if you miss!
Like any good exercise, "The Clock" can be built on. The next step is for the coach to set the students a goal from buoy to buoy, so that he can send them on any chosen point of sail.
This really helps the students learn to control the boat, moving it towards a goal & maneuver it effectively. It also reinforces the points of sail.
The bouy colors should be alternated so the students have a good opportunity to observe the wind direction & stay oriented thru a series of maneuvers. We sometimes use a single BIG YELLOW ball as the windward-most buoy.
Going a little further with "The Clock" family of drills: This is one of the few which involve racing... actually it's not like real sailboat racing, it's more of a scramble, but it reinforces previous lessons about points of sail, maneuvering, Right-Of-Way (almost everything, in fact) plus it's really fun!
This drill is for advanced students who know all the points of sail, the maneuvers between each one, and are familiar with the Right-Of-Way rules.
As with the other "Clock Drills" the buoys are set in a big circle.
The idea of "Racing The Clock" is that all the boats have to be kept under control within a small area... close-quarters maneuvering, in other words. The students also have all the variables of real-world sailing to contend with... the wind-shadow of the other boats, making maneuvers around buoys & other boats, and of course keeping the boat moving towards a given goal.
The game is played by having the coach, or the skipper who is leading at a given mark (buoy), call out the next buoy. It can be any buoy in the clock, but the call has to be made as soon as it can be determined who the leader is (or the coach makes the call).
When a boat has kept the lead position around 3 or more buoys, that boat is either given a 720 penalty, or simply told the circle around to the back of the fleet.
Often the best sailors will be able to work their way thru the pack, and reclaim the lead; but it is good practice for them to do so. This also adds to the fun, since every boat should get a chance to be in the lead at some point during the drill.
..............................................................................................................................................................
Sailing to Windward... we will lead the 'Baby Ducks' on a close-hauled course and expect the students to recognize this (and every other) POINT OF SAIL, and also practice TACKING, before starting on more advanced drills. Here are two advanced drills to work on the skills of sailing to windward
The Pipeline (link)
"The Cone"
This is a popular exercise for racing teams.
It's called "The Cone" because of the cone-like area which the students have to stay in. This drill is for students who have learned the basics of sailing upwind.
The coach boat goes straight upwind (not too fast, please), the students sail back & forth independently. It's good practice tacking, helps learn to judge the layline, puts the Right-Of-Way rules into effect, and it's a little more fun that the plain-vanilla 'Baby Ducks' drill.
In this 2nd diagram, we see "The Cone" in action.
Boat A is tacking ot stay in the cone, she is on the layline to the coachboat.
Boat B needs to tack immediately, she is about to sail out of the cone.
Boat C is on Port Tack and will need to be careful of B after B tacks.
Boat D needs to work on sailing upwind a little faster!
Similar to 'The Cone' is a tacking drill, where all students sail upwind and all tack at signal (whistle) from the coach.
When we sail a boat, we need to do at least 11 or more things simultaneously. So, a beginning sailor (especially the skipper) typically gets yelled at "Pull the fumbledygumble" or "Straighten your mapperfrapper" and a constant stream of similar nonsense.
When we have sailing drill, we practice ONE specific task; and we do it all together so the student not only gets feedback on their own skill but also sees examples of how to do it (or how not to, in some cases). For now, just for the drill, ignore the mapperfrapper & fumbledygumble. We'll work on those things later!
"Baby Ducks"
The basic of basics... usually this will be the first sailing exercise
No buoys, this drill is entirely dependent on the coach boat following a good course for the beginner students.
With the "Baby Duck" drills, the student only has to practice ONE skill at a time. Ignore sail trim, point of sail, balance, navigation, right-of-way, etc etc etc. Well, it helps if the crew trims the jib somewhat-properly. But all they have to do is steer & follow the others.
Skipper should focus on steering the boat steadily & accurately. The goal is to acquire a “feel” for the tiller. The boat will not go straight just because you are holding the tiller straight!
Notice that the students still have to TACK (turning the boat so that the wind crosses the bow, and comes on the other side). This is not difficult but they should at least know what's coming. They should also observe for themselves that the boat cannot sail straight into the wind!
While tacking, the student skipper(s) can practice shifting sides with the mainsheet & tiller extension. The crews practice keeping the boat from heeling by shifting their weight & trimming sails, and of course keeping lookout.
Here is where the "Baby Duck" drills really pay off. The instructor controls when the students GYBE their boats for the first few times.
The student skippers & crew practice moving & trimming sail together; work on anticipating the gybe. All should be smooth & coordinated. Watch for the jib to lose wind, this is when the crew begins to shift the jib sheet & can then help the skipper bring the main across.
Once the students can steer, and keep the boat under control (or at least fake it) thru the basci maneuvers, it is time to add to their skills. The "Baby Duck" can be used to reinforce learning the basic points of sail.
In this diagram (left) we see one boat hasn't quite got the hang of "CLOSE-HAULED" yet.
There are other, later drills which will emphasize sailing to windward, but this will get us started.
And of course, once we have sailed upwind for a while, we will need to turn & go downwind... this is also a basic skill that needs practice
Students who demonstrate they are fully in control of their boats through-out the various "Baby Duck" drills are good candidates to move up to advanced practice.
......................................................................................................................................................................
Docking... when stopping is more important than speed...
Once we get pretty good at "baby ducks" then the next step is learning to stop the boat. A sailboat will never really stop & stay in one place; it is always under the influence of wind & current (this is why the anchor is an important piece of safety equipment) BUT we must be able bring the boat in... just like pilots must learn to land an airplane... in order to go out.
If you can't STOP you are not in control!
Stopping Without Brakes (just sails) (link)
One way to stop & park is to simply turn the boat directly upwind. The sails will flap, the boat will coast to a stop. A problem: as the boat slows down, the rudder loses effectiveness... you can't steer!
Pointing the bow into the wind will bring the boat to a stop (right).
Another problem: you need an open & safe area to windward for the boat to 'coast' on it's momentum.
Another problem: you can never be exactly sure where the boat will stop... in light air, there is less drag on the sails, and it may 'coast' a surprisingly long way. In strong wind, the boat is going faster under full sail, but the drag on the sails & rig is much stronger and slows the boat's progress much more... it goes faster but doesn't 'coast' as far.
When beginner skippers are practicing DOCKING it is common to see them misjudge the momentum of the boat, either coming in too fast or stopping too soon and being unable to reach. This is why it takes practice!
With a coach boat anchored, students make their docking approaches in open water, coming up to a nice soft inflatable "dock."
This way we gain the skill to make perfect landings under a wide variety of conditions... this will enable us to SAIL in a wide variety of conditions!
.......................................................................................................................................................................
"The Clock"
This is actually several drills which be expanded from a basic exercise/drill to advanced racing games.
The buoys are set in a big circle; in the BASIC exercise, the students simply sail to & past each one. This takes them onto every point of sail, and obviously they will have to tack & gybe on their way round the "clock."
This is a good reinforcement for students who can steer the boat and are beginning to learn how to set the sails for each "point of sail."
If any student shows a tendency to sail of into the distance, the coach can give him the challenge of sailing close to each buoy on his way around the circle, and having the crew touch each one. No going back if you miss!
Like any good exercise, "The Clock" can be built on. The next step is for the coach to set the students a goal from buoy to buoy, so that he can send them on any chosen point of sail.
This really helps the students learn to control the boat, moving it towards a goal & maneuver it effectively. It also reinforces the points of sail.
The bouy colors should be alternated so the students have a good opportunity to observe the wind direction & stay oriented thru a series of maneuvers. We sometimes use a single BIG YELLOW ball as the windward-most buoy.
Going a little further with "The Clock" family of drills: This is one of the few which involve racing... actually it's not like real sailboat racing, it's more of a scramble, but it reinforces previous lessons about points of sail, maneuvering, Right-Of-Way (almost everything, in fact) plus it's really fun!
This drill is for advanced students who know all the points of sail, the maneuvers between each one, and are familiar with the Right-Of-Way rules.
As with the other "Clock Drills" the buoys are set in a big circle.
The idea of "Racing The Clock" is that all the boats have to be kept under control within a small area... close-quarters maneuvering, in other words. The students also have all the variables of real-world sailing to contend with... the wind-shadow of the other boats, making maneuvers around buoys & other boats, and of course keeping the boat moving towards a given goal.
The game is played by having the coach, or the skipper who is leading at a given mark (buoy), call out the next buoy. It can be any buoy in the clock, but the call has to be made as soon as it can be determined who the leader is (or the coach makes the call).
When a boat has kept the lead position around 3 or more buoys, that boat is either given a 720 penalty, or simply told the circle around to the back of the fleet.
Often the best sailors will be able to work their way thru the pack, and reclaim the lead; but it is good practice for them to do so. This also adds to the fun, since every boat should get a chance to be in the lead at some point during the drill.
..............................................................................................................................................................
Sailing to Windward... we will lead the 'Baby Ducks' on a close-hauled course and expect the students to recognize this (and every other) POINT OF SAIL, and also practice TACKING, before starting on more advanced drills. Here are two advanced drills to work on the skills of sailing to windward
The Pipeline (link)
"The Cone"
This is a popular exercise for racing teams.
It's called "The Cone" because of the cone-like area which the students have to stay in. This drill is for students who have learned the basics of sailing upwind.
The coach boat goes straight upwind (not too fast, please), the students sail back & forth independently. It's good practice tacking, helps learn to judge the layline, puts the Right-Of-Way rules into effect, and it's a little more fun that the plain-vanilla 'Baby Ducks' drill.
In this 2nd diagram, we see "The Cone" in action.
Boat A is tacking ot stay in the cone, she is on the layline to the coachboat.
Boat B needs to tack immediately, she is about to sail out of the cone.
Boat C is on Port Tack and will need to be careful of B after B tacks.
Boat D needs to work on sailing upwind a little faster!
Similar to 'The Cone' is a tacking drill, where all students sail upwind and all tack at signal (whistle) from the coach.